


The Right Way to Handle Event Swag Logistics From Order to Onsite


Run event swag logistics on one model: centralized procurement, event-specific kitting, and staged shipping timed to your venue’s receiving window. That combination cuts the two failure points that wreck most swag programs — mismatched inventory across locations and shipments arriving after the trade show floor opens. Everything else in this guide supports that operating model.
Before you place another order, do three things:
- Confirm headcount and attendee mix. Get a real number from the event organizer, not a guess, and separate staff, VIPs, and general attendees.
- Lock artwork and reorder windows. Approve final art files at least two weeks before your production deadline so you’re not paying rush fees for a delay you caused.
- Pick your fulfillment path now. Decide between bulk warehouse shipping to one dock or drop-shipping to the venue or hotel directly. Waiting until week two forces you into the expensive option by default.
Discountswag runs this exact model for corporate clients, from single-location kitting to multi-city rollouts, without asking you to piece together three separate vendors to get there.
Key Takeaways
The most reliable event swag program combines centralized ordering, event-specific kitting, and shipping timed to the venue’s actual receiving window, not the calendar date of the event.
| Point | Details |
|---|---|
| Start production early | Begin the artwork and approval process 6 weeks out for small events, 10 to 12 weeks for large ones. |
| Build in contingency stock | Reserve 8% to 10% of total units above forecast to cover overstock risk and last-minute demand shifts. |
| Confirm venue receiving rules | Call the hotel or convention center before shipping to avoid storage fees or refused early freight. |
| Track depletion in real time | Use manual counts every 90 minutes or a QR-based system to catch shortfalls before they hit the floor. |
| Use Discountswag for execution | Discountswag handles rush production, multi-location fulfillment, and segmented kitting under one order. |
Table of Contents
- Planning Timelines: When to Order, Approve, and Confirm Event Swag
- Should You Warehouse Swag or Fulfill On Demand?
- Kitting Workflows: Assembly, QA, and Attendee Assignment
- Shipping Choices, Carrier Selection, and Cutoffs You Can’t Miss
- Running Distribution Onsite Without Chaos
- What Metrics Actually Prove Swag Worked
- When Shipments Go Wrong: Contingency Rules That Work
- Discountswag’s Practical Checklist and Rush-Order Recipe
- How Discountswag Handles the Logistics You Just Read About
- Sources
Planning Timelines: When to Order, Approve, and Confirm Event Swag
Production lead times are the single biggest variable planners underestimate. Artwork approval, imprinting, quality proofing, and final production each eat calendar days, and skipping a step doesn’t save time. It just moves the failure downstream to your shipping window.
For a small event (250 attendees or fewer), a realistic timeline runs:
- Weeks 6 to 5 before the event: Finalize item selection and submit artwork for proofing.
- Weeks 5 to 4: Approve digital or physical proofs and confirm imprint colors.
- Weeks 4 to 2: Production runs, typically 5 to 10 business days depending on item complexity.
- Week 2 to event date: Ship and confirm venue receiving.
Medium events need an extra week of buffer for multi-item kits, and large programs should start the process well in advance, particularly if you’re sourcing tech items or apparel that require garment decoration lead time on top of standard imprinting, particularly if you’re sourcing tech items or apparel that require garment decoration lead time on top of standard imprinting.
Rush production exists, but it costs. Expedited turnaround on apparel or drinkware commonly carries a noticeable premium over standard pricing, and some complex tech items simply can’t be rushed below a hard production floor no matter what you’re willing to pay. Build your true deadline backward from the rush ceiling, not the standard one, so you know exactly how much slack you actually have.
The most common failure point isn’t production delay. It’s approval delay. Marketing teams sit on proofs for a week, then wonder why the standard timeline no longer applies. Treat every proof approval like a hard deadline with a named owner, because a proof that sits in someone’s inbox for four days has functionally shortened your production window by four days. For a full breakdown of ordering windows by item category, see how to order branded merch without delays.
Should You Warehouse Swag or Fulfill On Demand?
The choice between bulk warehousing, regional storage, and on-demand fulfillment comes down to how many locations you’re serving and how predictable your headcount is.
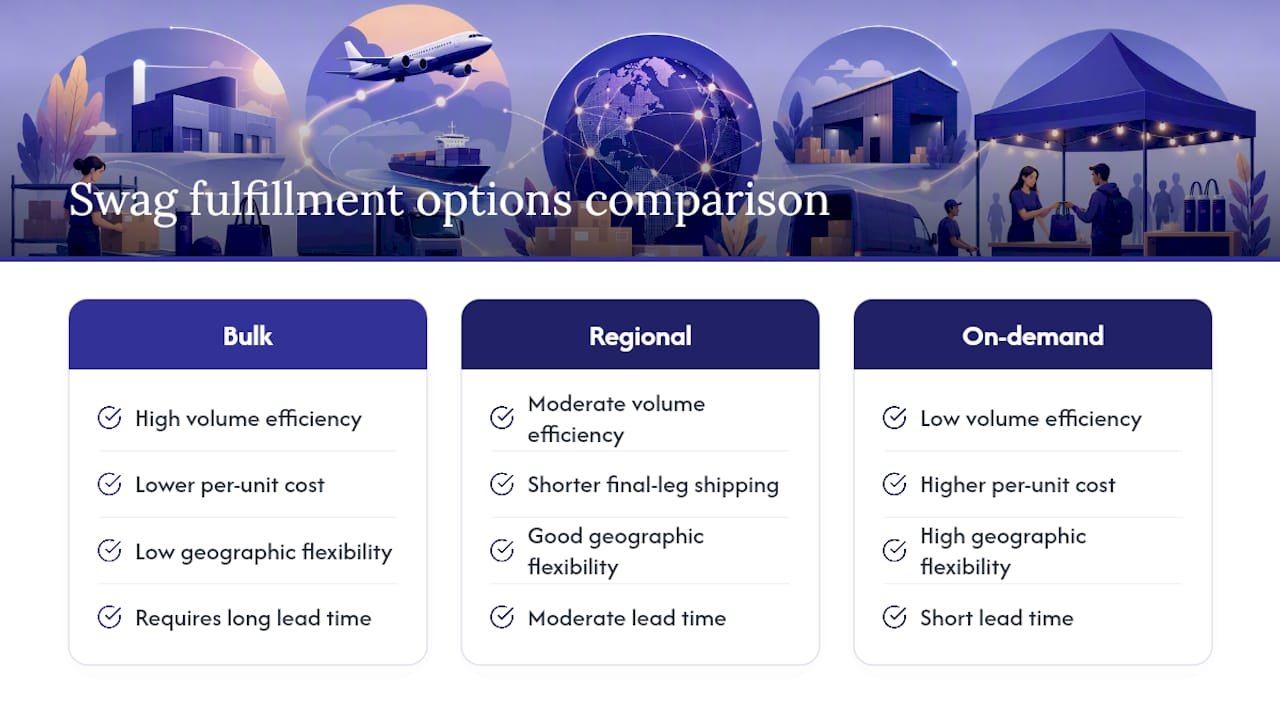
Bulk warehousing works when you’re running one large event from a single dock. You order in volume, get better per-unit pricing, and avoid repeat shipping charges. The tradeoff is storage cost and the risk of overstock if attendance comes in lower than projected.
Regional or multi-location warehousing makes sense for companies running the same swag campaign across several offices or a multi-city roadshow. Rather than shipping everything from one point, you split inventory closer to each destination, which shortens the final leg of delivery and reduces the odds of a single point of failure taking down every location at once. Merchloop’s guidance on multi-location swag logistics points to exactly this pitfall: companies that ship one giant pallet to a central office and then try to redistribute internally usually lose time and units in the handoff.
On-demand fulfillment fits distributed teams or ongoing programs where you don’t know exact quantities months in advance. You order smaller batches closer to the date, which limits the per-unit discount but eliminates warehousing risk entirely.
A workable forecasting rule: plan for 1.1 to 1.3 units per confirmed attendee for high-demand items like apparel or drinkware, and reserve a smaller allotment (closer to 0.5 per attendee) for premium or limited items you want to feel scarce. Set a reorder trigger at 20% remaining stock with at least one week of lead time still available, not at zero.
When shipping to a hotel or convention center, label every box with the event name, booth number, and a “hold for guest arrival” instruction, and call the venue’s receiving desk in advance to confirm they accept early deliveries. Convention centers in particular often charge daily storage fees for anything that arrives more than a day or two before your move-in date, and some require a completed material handling form before they’ll even accept the shipment.
Pro Tip: Ship one “emergency box” separately, via a different carrier if possible, containing a small reserve of your highest-demand item. If your main shipment gets delayed, you’re not starting from zero on the show floor.
Kitting Workflows: Assembly, QA, and Attendee Assignment
Kitting is where clean logistics plans fall apart if nobody owns the process. A kit that looks simple on a spec sheet (one shirt, one bottle, one notebook) still requires staging, counting, and quality checks before it ships or lands on a table.
A working kitting checklist looks like this:
- Stage inventory by SKU in a dedicated area, counted and verified against your purchase order before assembly starts.
- Confirm exact item counts per kit against your attendee segmentation, not a rounded estimate.
- Apply label templates consistently, whether that’s a name label, a badge-tier sticker, or a barcode.
- Pull a QA sample of at least 5% of finished kits and physically check contents against the packing spec before sealing the rest.
- Log completed kit counts against your target so shortfalls surface before shipping day, not at the booth.
The bigger strategic decision is pre-kitted boxes versus pick-and-pack by segment. Pre-kitted boxes work well when every attendee gets an identical kit. It’s faster to assemble at scale and cheaper per unit. Segmented kitting, where sponsors get a different mix than general attendees or VIPs get an upgraded item, requires pick-and-pack accuracy and a labeling system that can’t rely on memory.
- Use a barcode or QR code tied to a CSV export of your attendee list, so each kit’s label maps directly back to a record rather than a printed name someone has to eyeball match.
- Reachdesk’s documented event fulfillment model shows how larger fulfillment operations pair warehousing with on-demand kitting specifically to handle segment variation without slowing down the base assembly line.
- Tools built on platforms like Shopify can export order data directly into label templates, cutting the manual re-entry step that causes most mislabeled kits.
- Never rely on a single person to hand-sort segmented kits at volume above a few hundred units. Build the sorting logic into the label or barcode instead.
Shipping Choices, Carrier Selection, and Cutoffs You Can’t Miss
Your carrier choice depends entirely on package profile. Small parcel shipments (individual boxes under 150 pounds) move fine on standard ground service from major carriers, but pallet or crate shipments need less-than-truckload (LTL) freight, which runs on a completely different timeline and requires a loading dock or freight-capable receiving area.
- Small packages, non-urgent: Ground shipping, 5 to 7 business days, lowest cost per unit.
- Small packages, tight timeline: Expedited or 2-day air, at a meaningful cost premium over ground.
- Pallets or crates: LTL freight, which typically needs 7 to 10 business days of lead time and a confirmed delivery appointment with the venue.
Before you ship anything, call the venue or show organizer and confirm their receiving window. Convention centers commonly enforce a rule that shipments arriving before a set date get charged storage fees, and some venues refuse early freight entirely. Hotels are usually more flexible but have far smaller storage areas, so a large pallet shipment to a hotel loading dock without advance confirmation is a common way to arrive at a “sorry, we don’t have room for that” conversation.
Insure and track everything above a minimal declared value, and get a tracking number logged in a shared document your whole team can access, not just the person who placed the order. As a baseline cutoff rule: ground shipments should leave your fulfillment point no later than 10 business days before the event, and LTL freight needs at least 12 to 14 business days of buffer to absorb the appointment scheduling delays that freight carriers routinely introduce.
If your program ships high volume year over year, it’s worth asking your carrier about carbon-conscious shipping options. Stripe Climate outlines how businesses can direct a portion of shipping spend toward carbon removal, which is a reasonable answer when a sustainability-minded marketing team asks what you’re doing about freight emissions.
Running Distribution Onsite Without Chaos
The best-planned shipment still fails if the booth team doesn’t have a distribution plan. Staffing needs three defined roles at minimum:
- A greeter or scanner who checks attendees in and hands off the item or voucher.
- A stock monitor who tracks remaining inventory against elapsed show hours, not just at the end of the day.
- A replenishment runner who can pull backstock from a nearby storage room without pulling the greeter away from the booth.
Shift lengths of three to four hours keep staff sharp. An eight-hour solo shift on a booth is how items get handed out inconsistently and how theft or double-claiming goes unnoticed.
For high-demand or limited items, controlled release beats first-come-first-served every time. A voucher system, where attendees get a ticket at check-in redeemable at a specific time, spreads demand across the day instead of creating a mob at 9 AM. An exchange desk, where attendees trade a completed survey or a business card for the item, works well for premium giveaways you want tied to a lead-capture action.

Real-time tracking doesn’t require enterprise software. A stock monitor doing a physical count every 90 minutes against a shared spreadsheet catches depletion trends early enough to slow distribution or call for a runner. Vendors like Xotski have built dedicated QR-based systems that log claims automatically and show a live depletion dashboard, which is worth considering if you’re running multiple booths and can’t rely on manual counts alone.
If you’ve handed out half your stock before the halfway point of the show, slow distribution immediately rather than waiting until you’re down to a handful of units with three hours left.*
What Metrics Actually Prove Swag Worked
Units distributed is the vanity metric. It tells you nothing about whether the swag did its job. The KPIs that actually matter are depletion rate against elapsed show time, attendee-to-claim ratio, and what happens after the event, not during it.
- Depletion rate shows whether your forecast matched reality, and a program that runs out at hour three of a three-day show has an inventory model problem worth fixing before the next event.
- Attendee-to-claim ratio tells you what share of registered attendees actually engaged with your booth enough to take an item, which is a rough but useful proxy for booth traffic quality.
- Post-event survey data, even a short two-question follow-up, tells you whether attendees remember the brand or just grabbed a free item and moved on.
QR codes and coupon redemptions give you a paper trail that’s far more reliable than eyeballing a table at the end of the day. A QR code printed on the item itself, redeemable for a discount or content download, tells you whether the item generated any post-event action at all. Badge scans at the point of handoff link the claim directly to a registered attendee record, which is useful if your event platform already supports scanning. Modern QR-driven check-in systems can correlate real-time swag claims with booth engagement, giving marketing teams a much clearer read on which items actually drove interaction versus which just moved off the table.
Feed this data straight into your next budget. It’s a directive. For more on connecting distribution data to measurable return, see why branded giveaways matter for marketing ROI.
When Shipments Go Wrong: Contingency Rules That Work
Every event program eventually loses a shipment, gets the wrong SKU, or ends up sitting on overstock. The programs that recover fast have rules in place before the problem happens, not a scramble after.
- Lost or delayed shipment: Call the carrier for a trace within the first hour of a missed delivery window, not after the show opens. Simultaneously, contact your local network or a same-day print shop for an emergency backup item, even a lower-quality substitute is better than an empty table.
- Wrong item received: Photograph the discrepancy immediately against your packing slip and flag it to your vendor before unpacking further, since some vendor return windows start ticking the moment a package is marked delivered.
- Vendor SLAs: Get production and delivery dates in writing before paying a deposit, and confirm what recourse exists if a vendor misses a committed ship date. Checking a vendor’s Trustpilot reviews before you commit to a large order is a fast way to spot a pattern of missed deadlines before it becomes your problem.
- Overstock: Reserve roughly 10% contingency stock above your forecast for cheap, versatile items, and plan a local overnight print or engraving option as backup for anything specialty or slow to produce.
None of this replaces good planning. It just means a single missed shipment doesn’t take down the whole event.
Discountswag’s Practical Checklist and Rush-Order Recipe
A condensed version of the checklist Discountswag uses with corporate clients covers four categories: item selection, imprint method, kitting complexity, and contingency stock. Get those four right and most swag programs run themselves.
Budgeting rules of thumb:
- Allocate roughly 60% to 70% of your swag budget to the items themselves, with the remainder split across imprinting, kitting labor, and shipping.
- Reserve some contingency stock above your forecast rather than ordering to exact headcount.
- Add a dedicated line item for kitting labor if you’re running segmented kits. It’s the cost planners forget most often.
Rush-order workflow, step by step:
- Contact your account rep with exact quantities and a hard event date, flagged as rush from the first message.
- Approve digital proofs within 24 hours. Rush timelines don’t have slack for a slow signoff.
- Confirm expedited production and shipping costs upfront so there’s no surprise invoice after the fact.
- Get a tracking number the day production completes, not the day it’s requested.
The corporate event merchandise checklist covers the full version of this framework if you want a template to adapt for your own program.
An Insider’s Take on What Actually Saves Events
One rescue that sticks with me: a client’s pallet of branded totes sat at a freight terminal two states away the morning of a trade show, and the only thing that saved the booth was a same-day local order of a cheaper substitute item nobody planned for. The lesson wasn’t “buy insurance.” It was “always have a plan B vendor lined up before you need one.”
Two shortcuts worth stealing: assign a day-of runner whose only job is replenishment, freeing your greeter to keep the line moving, and pre-label attendee segments (VIP, sponsor, general) before the event so nobody’s sorting kits by hand at 7 AM. The corporate event merchandise checklist has templates for both.
— Jerry
How Discountswag Handles the Logistics You Just Read About
Discountswag runs the model this whole guide describes: centralized procurement, event-specific kitting, and staged shipping, without forcing you to coordinate separate vendors for each piece.
If you’re facing a tight production window, Discountswag offers rush ordering with expedited proofing and production so a compressed timeline doesn’t mean cutting corners on quality. Coordinating a multi-city rollout or a multi-office giveaway? Fulfillment to single or multiple locations is built into how orders get processed, not an add-on you have to request separately. Need pre-kitted sponsor boxes segmented from general attendee kits? That’s a standard kitting request, not a custom project.
Call Discountswag when your timeline is under six weeks, when you’re shipping to more than one venue, or when you need segmented kits assembled correctly the first time. Start by browsing how to choose corporate swag that works to match items to your event before locking your order.
 Bottle Carriers
 Mugs
Mugs